Pages

4.01.2011

Bedroom Progress: Little by Little

This past weekend we finally finished painting our walls Benjamin Moore's  'American White.'  After painting our first room ever, we can now officially say this: we. realllllly. hate. painting.  I was in charge of putting painter's tape around the trim and baseboards, along with edging in, while Tim used the roller.  End result?  We absolutely love the color and can't wait to paint our other rooms even though it's not our favorite thing to do.

We left our trim and baseboards unpainted although they would look amazing painted a nice, crisp white next to our light gray walls.  The only problem is our whole house's trim and baseboards are unpainted so we don't want to break the consistency.  So, instead, we decided that we're going to hang some thick cotton white curtains.  We found some inexpensive 84" curtains at good ole' Target in 'sailcloth white' (only 18.99 for two panels!) that will look amazing when we finally get around to hanging them.  

There was one tiny snag in the painting process.  Prepping and painting a room is really simple right?  So what could possibly go wrong?  Before we painted, we applied spackle, let it dry, and then started sanding. Mid-sanding job, Tim read the spackle label.  It basically said it may cause cancer and to wear a mask.  Most people probably wouldn't think twice about reading the label, because spackling is pretty straightforward, right?  At this point we were maskless and the dust was everywhere.  With a little research, Tim also discovered that spackle dust can clog vacuums and most vacuum warranties do not cover this.  We love our yellow Mr. Dyson, so we went out to Home Depot to buy a shop vac.  We went with a Rigid 14 gallon and bought a small particle catching bag so the fine spackle dust wouldn't be blown around the room by the exhaust.

Tip: To save yourself from inhaling potentially hazardous dust and a messy clean-up, don't use sandpaper.  Instead, take a damp sponge and gently rub the spackled area that needs to be smoothed out.

Before shot: 


Progress shot:


Our walls can sometimes look a little white because they're a very light shade of gray, but up against a white piece of furniture you can see their true color.

 We still need to refinish our thrift store nightstands, hang curtains, and get some accent pillows for the bed, but it's coming together!

3.29.2011

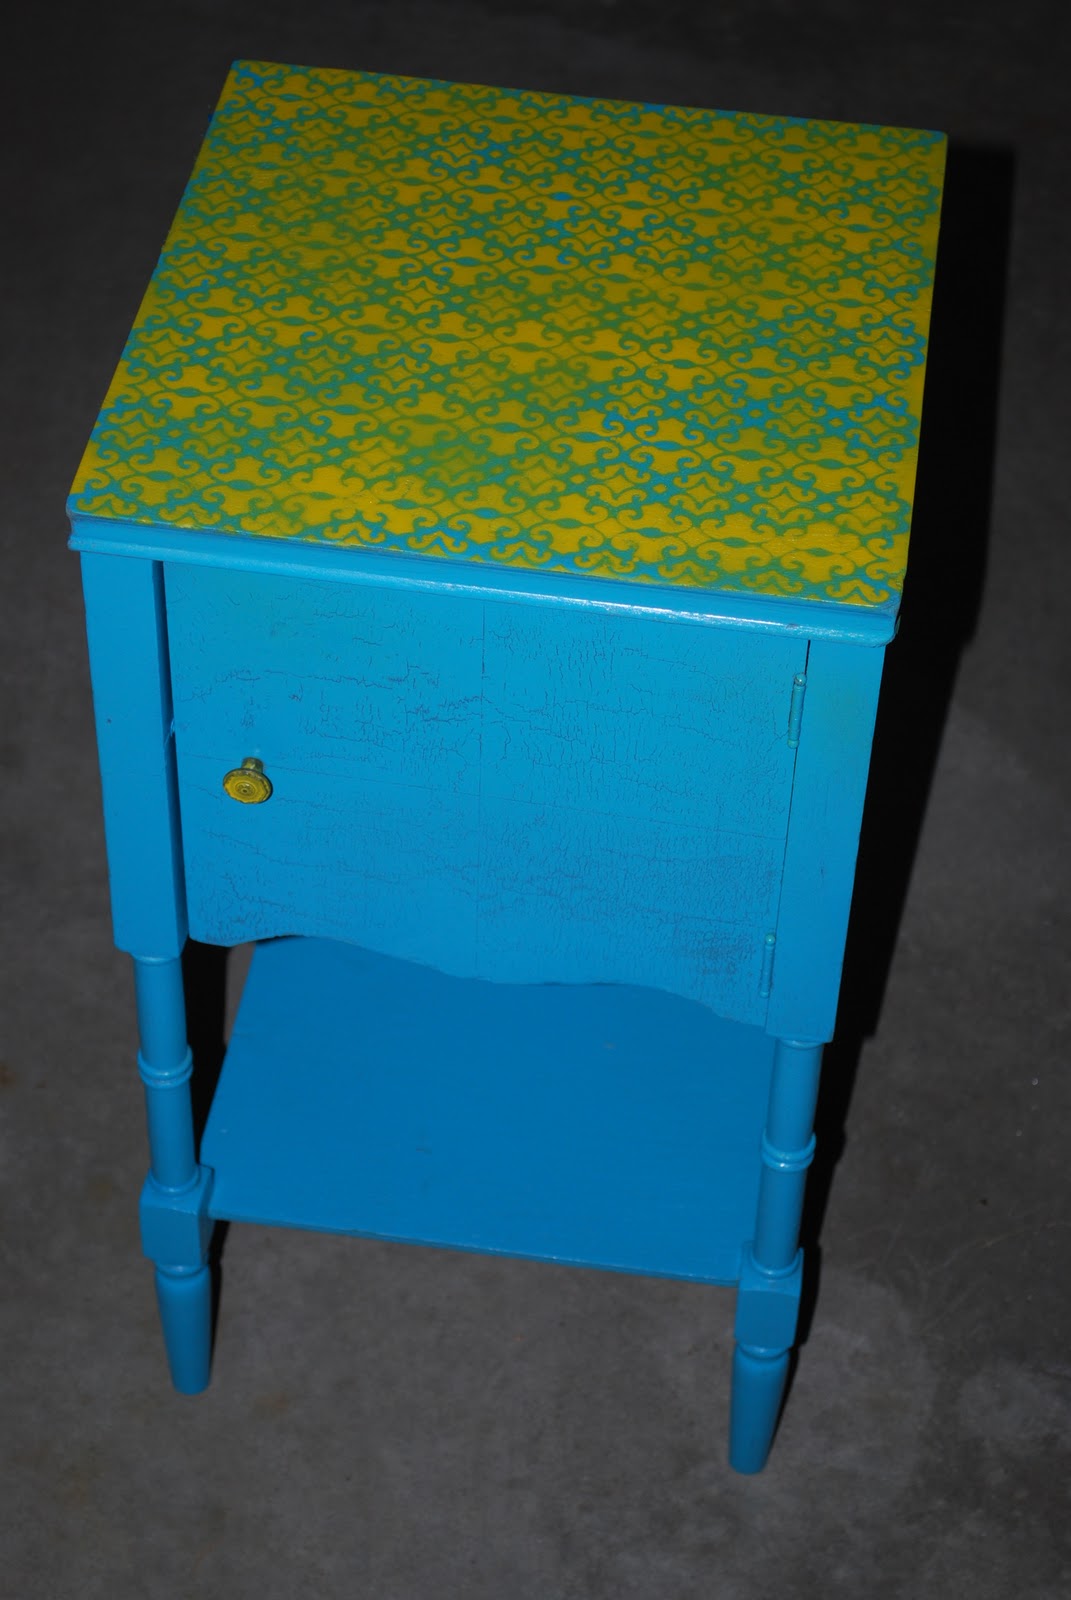
Our Three Dollar Table Makeover

I scored this $3 table in need of lots of TLC a little while ago and couldn't pass it up.This is what it looked like when I brought it home:

While sanding I discovered that the laminate layer on the top of the table was falling apart and missing some pieces, so I broke out some wood filler and went to town.  Then, I sanded it down and spraypainted a couple coats of Valspar's Exotic Sea in gloss.  


I wanted to do a patterned design on top of the table, but couldn't find any stencils I liked so I used cardstock with a cut out design.  I taped it to the top of the table with Scotch blue painter's tape and used a random yellow can of spraypaint we found in the garage when we moved in.  I also taped around the perimeter of the table below the cardstock to catch any stray spraypaint.  If you're doing two coats of spraypaint like I did, leave the stencil on after the first coat and allow it to dry.  Try not to peek because the stencil will move and it's tough to get the stencil back to it's exact place for the next coat when the paint's wet.  And don't worry if it doesn't come out perfect because it probably won't! After one coat of yellow spraypaint, I lifted up the stencil to see how it turned out, so I had to completely take off the stencil, wait until the spraypaint had dried, then had to match it up as best I could for the next coat of spraypaint.


After searching four different stores for one cute and colorful knob with no avail, I spraypainted the existing knob with my yellow spraypaint.


Voila! Isn't it cute?  


Total Cost: $7
  • Table: $3
  • Valspar spraypaint: $3
  • Cardstock w/ cutout design: $1

Linked up at:


    3.28.2011

    Sprucin' Up the Sunroom

    Last night Tim and I were talking about how we can't wait to use our sunroom when it gets a little warmer here (it's not heated). Since we've moved in, we've kept the french doors off the sunroom closed and have only gone in to check on our jacuzzi that came with the house - isn't that awesome, by the way? We're excited to use it, but we have to read up on how to use the array of cleaning chemicals the previous homeowner left us.


    This is what the sunroom looks like now:


    Our goal is to spruce up the room and take it away from that 'Xmas in July' theme for as cheap as possible with some fresh coats of paint and breezy curtains.  We're thinking of using 'Decorator White' on the paneling, and either 'Hawthorne Yellow' or 'Blue Danube' on the top half of the wall. What do you think? How would you decorate this room?

    Sunroom

    3.25.2011

    Lamptacular!

    We couldn't believe our eyes when we saw these two wooden lamp bases at Target for less than ten bucks each! They are super sturdy and were originally priced at $40 each!! We thought about spraypainting them a bright color for Spring, but decided against it. We really love the natural color of the wood and can't wait to put them on our nightstands when those are refinished. All we need now are some lamp shades and we're kicking ourselves for not picking up those at Target the day we found the lamps (they were marked down to an amazing clearance price of less than $5 each.) When we went back just a day later, they were all gone. Guess that teaches us to grab 'em before someone else does.

    3.24.2011

    Bringing the Outdoors In

    We love the outdoors - hiking, kayaking, mountain climbing, you name it. So naturally, we love bringing a little of the outdoors in. Literally.

    Check out this Natural tree stump side table from West Elm for $199.
    Photo from West Elm


    Luckily, we can save some big bucks because we already have our own little tree stump and branch side table. It's another completely free item given to us by my dad and I have no idea where he got it, but it's probably from the mid sixties. Because of our winter-like temperatures, I haven't been able to refinish this piece yet. I plan to do a dark stain/poly combo on it once the weather warms up a bit so this can be done outside. And hopefully that will be soon!


    3.23.2011

    Spring Has Sprung...But Wait!

    It's still Winter here! We can't wait to power wash our deck, open the pool, sand and stain our farmer's porch, and landscape a little, but just when we thought winter was over we get this:


    Which calls for us to cozy up to our gas fireplace. Yup, that wall color definitely needs to go (We have a couple of Ben Moore samples to try up our sleeves). We're also thinking of maybe painting the mantle white. Don't worry, we spared you the seashell sconces above the fireplace.

    3.22.2011

    Dining Room Furniture for the Bedroom

    A while ago I snagged this sturdy buffet piece for FREE. It used to be in my brother's bedroom and my mom was going to donate it. I saw some potential in it, even though it was stained a dark brown, had ugly brass hardware, and had my brother's name carved into the top.

    I don't have any before photos of it, but you can see how dark the stain was by looking at the inside, which I left completely untouched. I lightly sanded it by hand and then added a couple coats of Rustoleom Satin Paint in Heirloom White. I used a foam brush to make sure there wouldn't be any brush streaks and definitely took a chance by deciding not to prime and it worked out! A couple coats of paint was all it needed. I also spray painted the brass pulls, knobs, and hinges black for a cheap, easy fix.

    Even though it's probably meant to be dining room furniture, this baby is going right into the bedroom. I have so many pairs of jeans that I could probably fill a whole bureau and still run out of space, but because of the shelving inside, this guy's the perfect storage solution with plenty of room to spare. The only problem is it's so well-built and heavy, it might be sitting in the garage for a while because it's too difficult for Tim and I to carry upstairs together.

    After

    After

    After
    Related Posts Plugin for WordPress, Blogger...